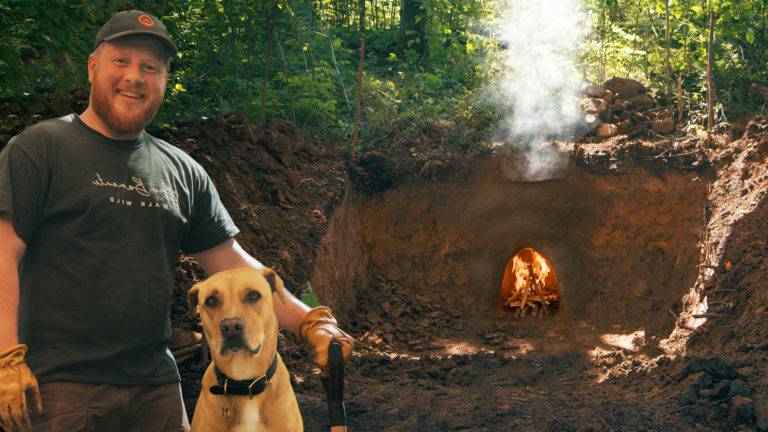
It’s been four or five years since we took on a large-scale bushcraft project like building a Bushcraft Basecamp. Bow and I were really excited to get out into the woods and get started on this project after a friend of ours Eric, offered us the use of his property.
We are looking to create a medium-sized Bushcraft Basecamp showcasing many of the useful wilderness skills that can be learned to create such a camp. We want to create something functional and beautiful that we can also use as a backdrop to run Bushcraft 101 courses for teaching people basic bushcraft skills.
Advertisement
What was the plan?
Day one of this project was all about clearing the area where the camp was to be built. While scouting the property, Bow had noticed that that was a beautiful open clearing with no large trees growing. With that being said there was a lot of sapling growth and shrubbery that needed to be removed so we could move freely through the area. This area was perfect as it not only had a large open and flat area of ground for having a fire pit and communal space, but also had a slight incline on the south side that would be perfect for a dugout shelter.
We were fairly off the beaten trail so we had to bushwhack a path through the very thick undergrowth of the forest. Using a machete at the front of the line, Bow hacked and slashed his way forming a trail. Eric and Matt followed behind tidying up and widening the trail out on removing any remaining shrubs.
After the ground was cleared, it was time to map out where we wanted to put our Bushcraft shelter or in this case a small Bushcraft home inside of the camp perimeter.
What Kind of Shelter are you building?
We decided to design a rudimentary dugout shelter carved out into the Hill on the south side of the camp. As the weather here in North and Canada can get down to -40 degrees Celsius having a shelter that is submerged in the ground should provide a lot better insulation for comfortable living. We also plan to add a wood-burning fireplace to the back of the shelter to keep it warm in the winter months. We have always wanted to work with clay and use wattle and daub techniques to construct such a thing and this will be our first time trying it.
After clearing the remainder of the brush from the shelter area, we sunk some marker sticks into the ground and mapped out the area of the shelter with marker tape. This will give us an estimated footprint of how big the shelter will be when it’s finished.
Advertisement
Conclusion
It’s amazing how clearing up a bit of brush already makes the space start to feel more familiar and habitable. We look forward to getting out there next time and starting excavation on the bushcraft shelter.
Learning bushcraft skills is one of the best ways to make your outdoor adventures more fun and rewarding. Whether you’re into camping, hiking, fishing or…